
Search Console shows aggregated crawl trends; server logs show every real request. A step-by-step guide to exporting logs, verifying Googlebot, catching spoofed crawlers, and reading crawl activity — by hand and with a free browser tool.
Server logs are the most direct way to understand how search-engine crawlers actually access your website. Search Console can show crawl trends and aggregated crawl activity, but server logs record the individual requests made to your server.
That makes log-file analysis useful when you need to answer questions such as:
- Is Googlebot actually crawling my newly published page?
- Which URLs are search engines crawling?
- How often are important pages being crawled?
- Are crawlers hitting redirects or error pages?
- Which bots are consuming server resources?
- Are some requests pretending to be Googlebot?
- Which pages are being ignored by crawlers?
This guide explains how to get your logs, verify crawler requests, analyze the data manually, and use a free browser-based tool to automate the process.
The examples use a real Hostinger Access Log export containing 455 requests recorded over roughly six hours.
Why use server logs for SEO? #
Server logs show individual requests to your server. Search Console does not provide that level of detail.
Search Console's Crawl Stats report is useful for understanding Google's overall crawling activity, but it is an aggregated view of crawl activity and can lag behind what is happening on the server.
Server logs contain the actual request, including:
- The requesting IP address
- The requested URL
- The user-agent
- The HTTP status code
- The timestamp
This means you can move from:
"Google appears to be crawling my website."
to:
"Googlebot requested this URL at this exact time, from this IP address, and received a 200 response."
That distinction is important when diagnosing crawling and indexing problems.
Server logs also contain traffic from crawlers other than Google, including Bingbot, AI crawlers, SEO crawlers, scrapers and automated scanners.
How to analyze server logs for SEO #
There are three practical ways to analyze log files:
- Manually using a spreadsheet or terminal.
- Using a dedicated log-analysis tool, such as Screaming Frog Log File Analyser.
- Using a browser-based tool that automatically classifies and visualizes the requests.
The manual method is important because it shows exactly what the data means. Once you understand the process, a tool can automate the repetitive parts.
Step 1: Get your server log files #
You need access to the logs generated by the server that actually serves your website.
Ideally, the log should contain:
- Timestamp
- IP address
- Requested URL
- HTTP status code
- User-agent
If your website uses Cloudflare #
If you are using Cloudflare's free plan, you may not have access to raw per-request logs through Cloudflare.
In that case, get the logs from your hosting provider or origin server instead.
If you use Hostinger #
In Hostinger's hPanel, go to:
Websites → Your Website → Manage → Analytics → Access Logs
The Access Logs section provides information such as:
- Timestamp
- IP address
- User-agent
- Request
- Response information
You can also filter the logs. For example, searching for Googlebot will show requests claiming to come from Googlebot.
Hostinger's interface provides a downloadable CSV export.
The dataset used in this walkthrough came from this export.
Other hosting providers #
If you use cPanel, VPS hosting, managed WordPress hosting or another provider, look for:
Raw Access Logs
If you cannot find them, ask your hosting provider where the raw server access logs are located.
Step 2: Understand the log format #
Before analyzing a log file, understand what each row represents.
Here is an example request from the dataset:
status: 200
ipAddress: 66.249.64.227
request: GET /blog/google-ai-mode-and-the-evolution-of-search-behavior HTTP/1.1
userAgent: Mozilla/5.0 (compatible; Googlebot/2.1; +http://www.google.com/bot.html)
timestamp: 2026-09-13T09:49:58.000000Z
This row tells us five important things:
1. Status code #
200 means the server successfully returned the requested resource.
2. IP address #
66.249.64.227 is the IP address that made the request.
3. Requested URL #
The request was made to:
/blog/google-ai-mode-and-the-evolution-of-search-behavior
4. User-agent #
The request claims to be:
Googlebot/2.1
5. Timestamp #
The request happened at:
2026-09-13 09:49:58 UTC
There is one important limitation here.
The user-agent is only a claim.
Anyone can send a request using:
Googlebot/2.1
That does not make the request genuine Googlebot traffic.
So crawler verification is an important part of log-file analysis.
Step 3: Verify whether Googlebot is genuine #
Do not trust the Googlebot user-agent alone.
Google's recommended verification process uses two DNS checks.
Step 3.1: Perform a reverse DNS lookup #
Take the IP address from the log and perform a reverse DNS lookup.
For example:
host 66.249.64.227
The result should resolve to a hostname associated with Google's crawler infrastructure, such as a hostname ending in:
googlebot.comgoogle.comgoogleusercontent.com
If the IP has no relevant hostname or resolves to an unrelated domain, treat the request as suspicious.
Step 3.2: Perform a forward DNS lookup #
Do not stop after the reverse lookup.
Take the hostname returned by the reverse lookup and resolve it again.
For example:
host crawl-66-249-64-227.googlebot.com
The hostname should resolve back to the same IP address you started with.
This two-step process prevents a fake hostname from being used to impersonate Googlebot.
Step 4: Identify spoofed Googlebot requests #
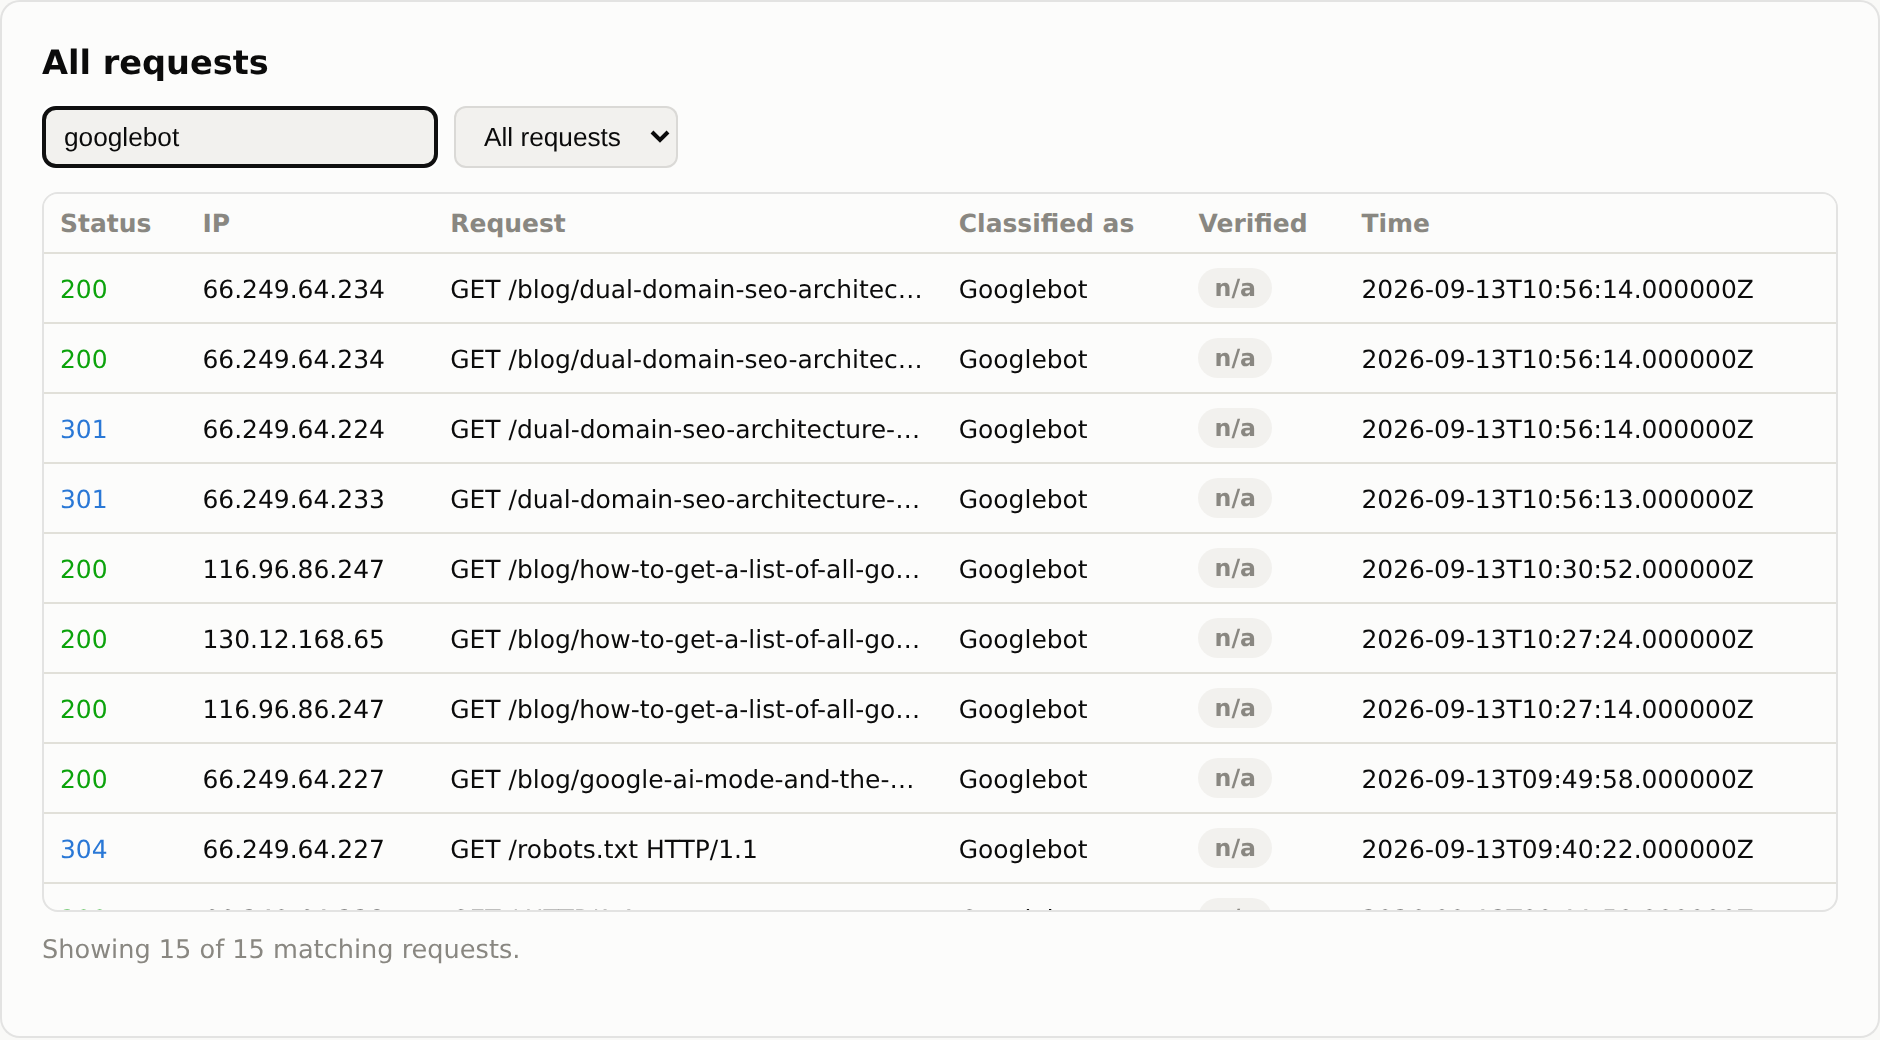
The dataset used for this analysis contained 15 requests claiming to be Googlebot.
Two of them failed verification.
| IP address | Reverse DNS result | Verdict |
|---|---|---|
66.249.64.234 |
crawl-66-249-64-234.googlebot.com → confirms to same IP |
Genuine |
66.249.64.224 |
crawl-66-249-64-224.googlebot.com → confirms to same IP |
Genuine |
116.96.86.247 |
No reverse DNS record | Spoofed |
130.12.168.65 |
Generic hosting-provider domain | Spoofed |
This is why checking the user-agent alone is insufficient.
Both suspicious requests used the Googlebot user-agent but did not originate from verified Google infrastructure.
They also requested the same page about checking Google's indexed pages, which is consistent with automated scraping.
Step 5: Verify crawler IPs at scale #
Manually checking every IP becomes impractical when a log contains thousands or millions of requests.
Major crawler operators publish IP ranges that can be used to automate this verification.
For example:
| Crawler | Verification source |
|---|---|
| Google crawlers | Google's published crawler IP ranges |
| GPTBot / ChatGPT-User / OAI-SearchBot | OpenAI's published crawler ranges |
| Claude crawlers | Anthropic's published bot ranges |
| Perplexity crawlers | Perplexity's published crawler ranges |
| Bingbot | Bing's verification tools or reverse DNS |
The important principle is:
Classify a crawler based on its infrastructure, not just its user-agent string.
Step 6: Analyze the logs for SEO problems #
Once you have identified genuine crawler requests, look for patterns.
There are four areas you should check first:
- Crawl frequency by URL
- Status codes
- Crawler distribution
- Crawl activity over time
6.1 Check crawl frequency by URL #
Find out which URLs are being crawled and how frequently.
Look for:
- Important pages receiving no crawler requests
- Pages being crawled unusually frequently
- Newly published pages receiving crawler visits
- Low-value URLs consuming crawl activity
- Repeated requests for the same URL
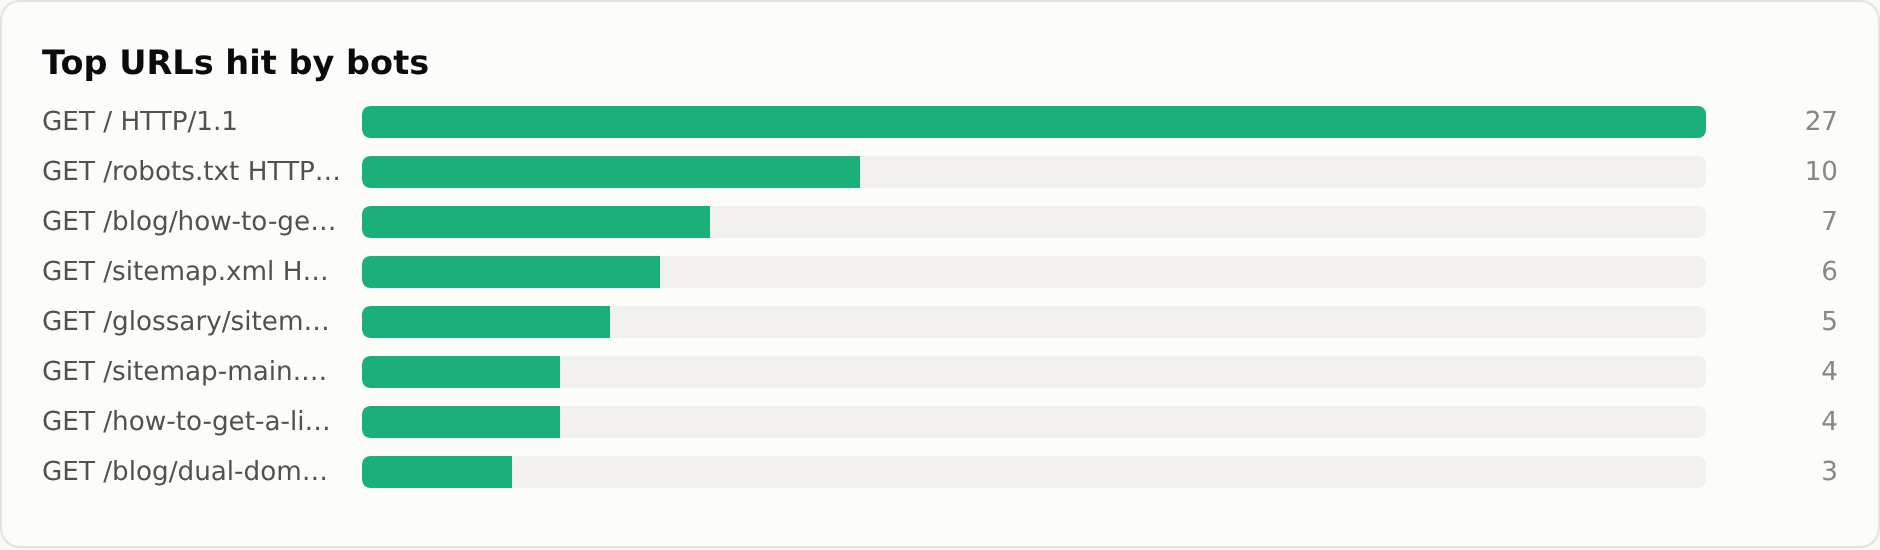
In the sample dataset, the homepage, robots.txt and sitemap.xml received significant crawler activity.
One particular blog post was requested five times by different bots within six hours.
That tells you the page was receiving active crawler attention during the period analyzed.
6.2 Check status codes by crawler #
Next, analyze the HTTP status codes returned to crawlers.
Pay particular attention to:
200— successful response301/302— redirects404— page not found410— permanently gone5xx— server errors
A crawler repeatedly hitting redirected URLs is worth investigating.
For example, the sample contained genuine Googlebot requests to:
/content-mapping-for-customer-intent-a-complete-guide
The URL returned a 301 redirect to the correct /blog/... URL.
The redirect itself is not necessarily an SEO problem.
However, if internal links or sitemap entries still point to the old URL, Googlebot is being sent through an unnecessary redirect.
The fix is straightforward:
Update the source of the internal link or sitemap entry to point directly to the final URL.
6.3 Analyze the crawler mix #
Do not assume that all bot traffic is Googlebot or Bingbot.
A server log can contain:
- Googlebot
- Bingbot
- AhrefsBot
- Bytespider
- YandexBot
- OpenAI crawlers
- PerplexityBot
- Amazonbot
- Security scanners
- Scrapers
- Other automated clients
The sample dataset contained several different crawler types.
It also contained a CMS-fingerprinting scanner requesting:
/admin
/admin/login.php
That traffic has nothing to do with search-engine crawling.
This distinction matters because not every bot request should be treated as SEO traffic.
6.4 Analyze crawl activity over time #
Sort requests by timestamp.
Then look for:
- Crawl bursts
- Repeated requests
- Sudden increases in bot traffic
- Crawling immediately after publishing content
- Long periods without crawler activity
- Repeated requests for the same URLs
For example, if a newly published article receives several verified Googlebot requests shortly after publication, you have direct evidence that Google has requested the page.
This is much stronger than simply assuming that a page was crawled because Search Console eventually reports activity.
Step 7: Analyze the logs using a spreadsheet #
You do not need specialist software to perform basic log analysis.
A spreadsheet is enough for a few hundred or thousand rows.
Create a crawler classification column #
Group user-agents into categories such as:
- Googlebot
- Bingbot
- OpenAI
- Perplexity
- Ahrefs
- Human
- Other
Then create a pivot table.
For example:
Rows: Bot name Values: Count of requests
This gives you a ranking of crawler activity.
Check status codes #
Filter the status-code column for values other than 200.
This quickly exposes:
- Redirects
- 404s
- Server errors
- Other unusual responses
Check URLs #
Sort or group by requested URL.
This shows which pages are receiving the most crawler attention.
Step 8: Use the terminal for faster analysis #
For larger files, command-line tools can answer simple questions quickly.
For example:
grep -c "Googlebot" access.csv
This counts rows containing Googlebot.
To count requests by IP:
awk -F, '{print $2}' access.csv | sort | uniq -c | sort -rn
This helps identify IP addresses generating unusually large numbers of requests.
However, request volume alone is not enough to determine whether a bot is genuine.
A single IP generating many requests may be a scraper, but genuine crawlers can also generate concentrated traffic.
Always combine volume analysis with crawler verification.
Step 9: Use a browser-based log analyzer #
If you have hundreds or thousands of rows, a browser-based analyzer can automate the repetitive work.
The tool used in this walkthrough works directly in the browser.
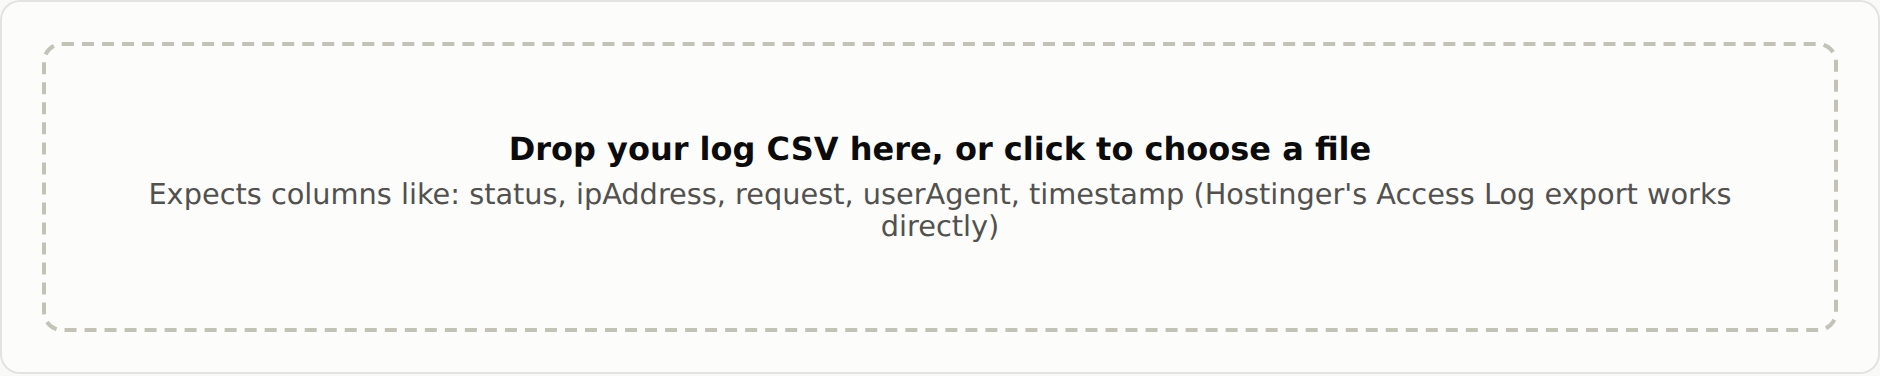
Step 9.1: Upload the CSV #
Drop your log CSV into the tool or select it from your computer.
The tool processes the file in the browser rather than uploading it to a server.
Step 9.2: Review the summary #
The tool automatically calculates:
- Total requests
- Bot requests
- Percentage of bot traffic
- Number of detected crawlers
For the sample dataset:
- 455 total requests
- 152 bot requests
- 33% bot traffic
- 14 detected bots

Step 9.3: Check Googlebot verification #
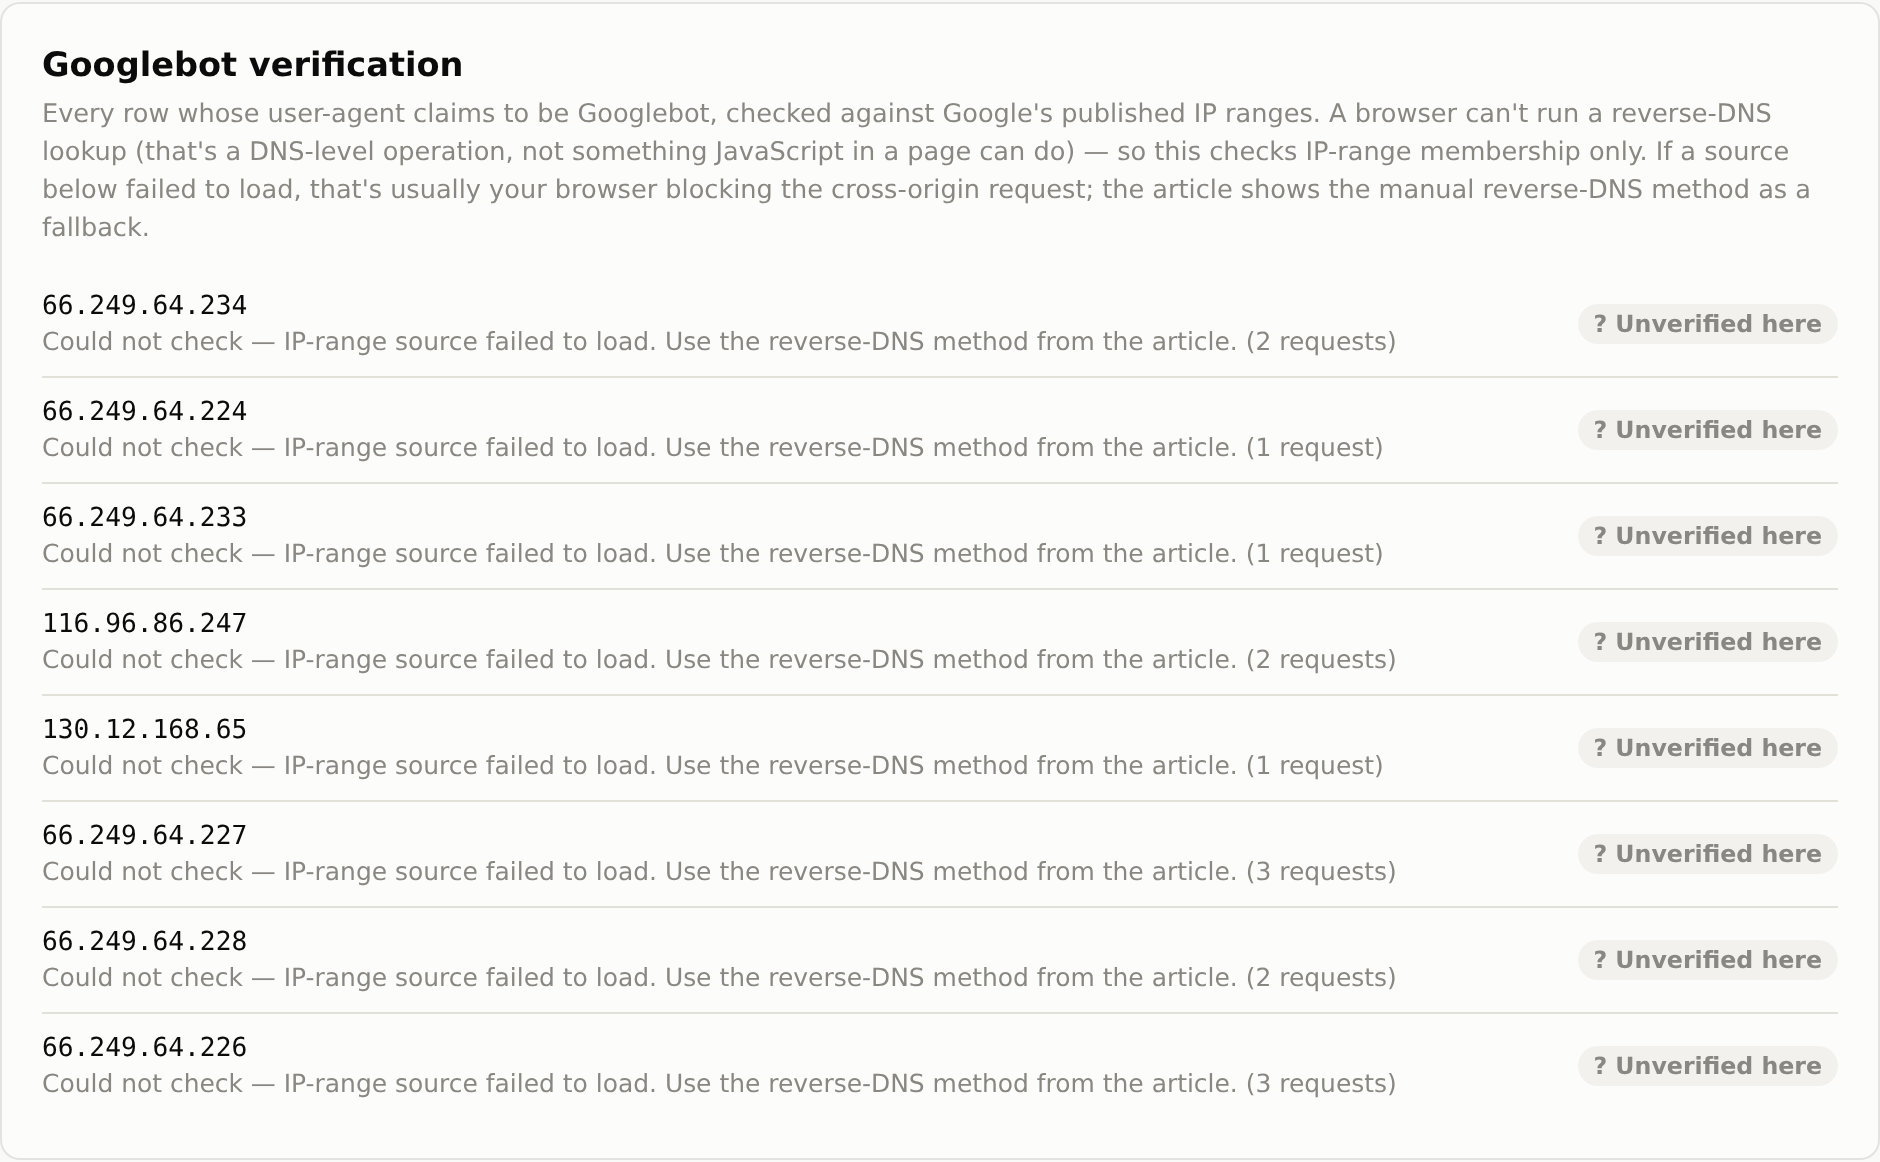
The tool identifies requests claiming to be Googlebot and compares their IP addresses against Google's published IP ranges.
There is an important technical limitation:
A browser cannot perform the reverse-DNS verification required for Google's complete two-step verification process.
Therefore, IP-range verification can be automated in the browser, while reverse-DNS verification remains the fallback for cases where full verification is required.
If Google's IP-range file cannot be fetched because of browser restrictions, the tool should report that limitation rather than treating the request as verified.
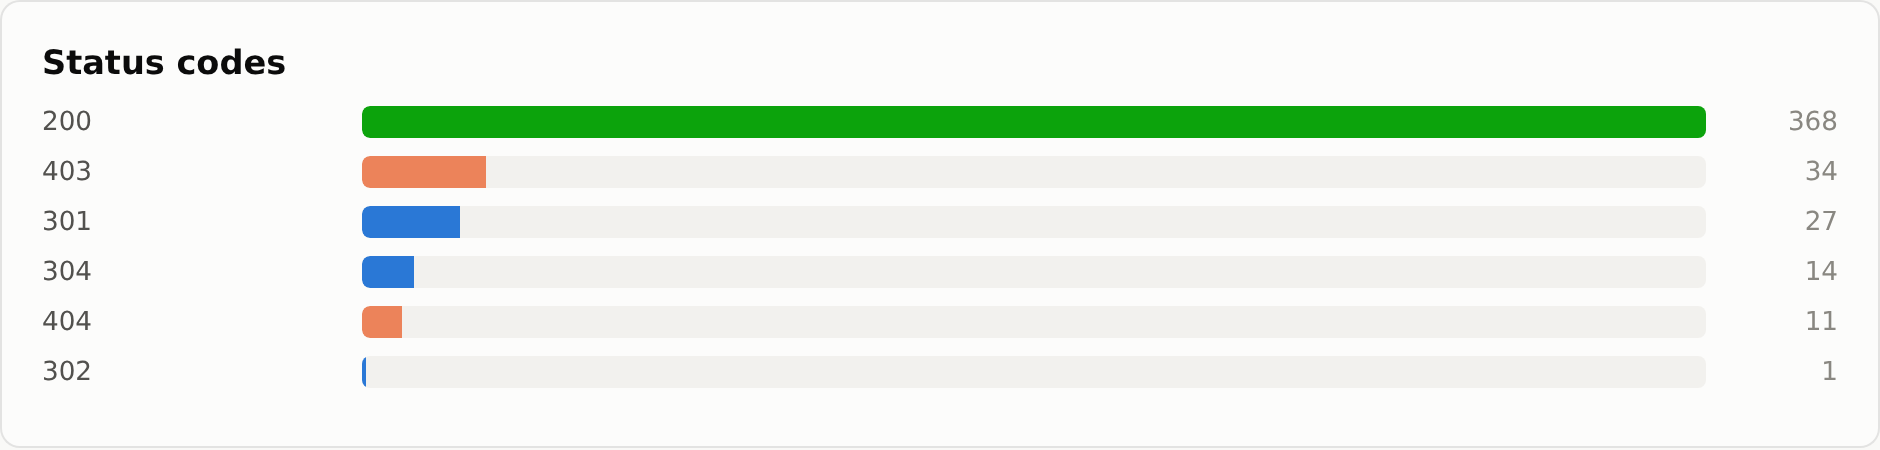
Step 9.4: Review the crawler charts #
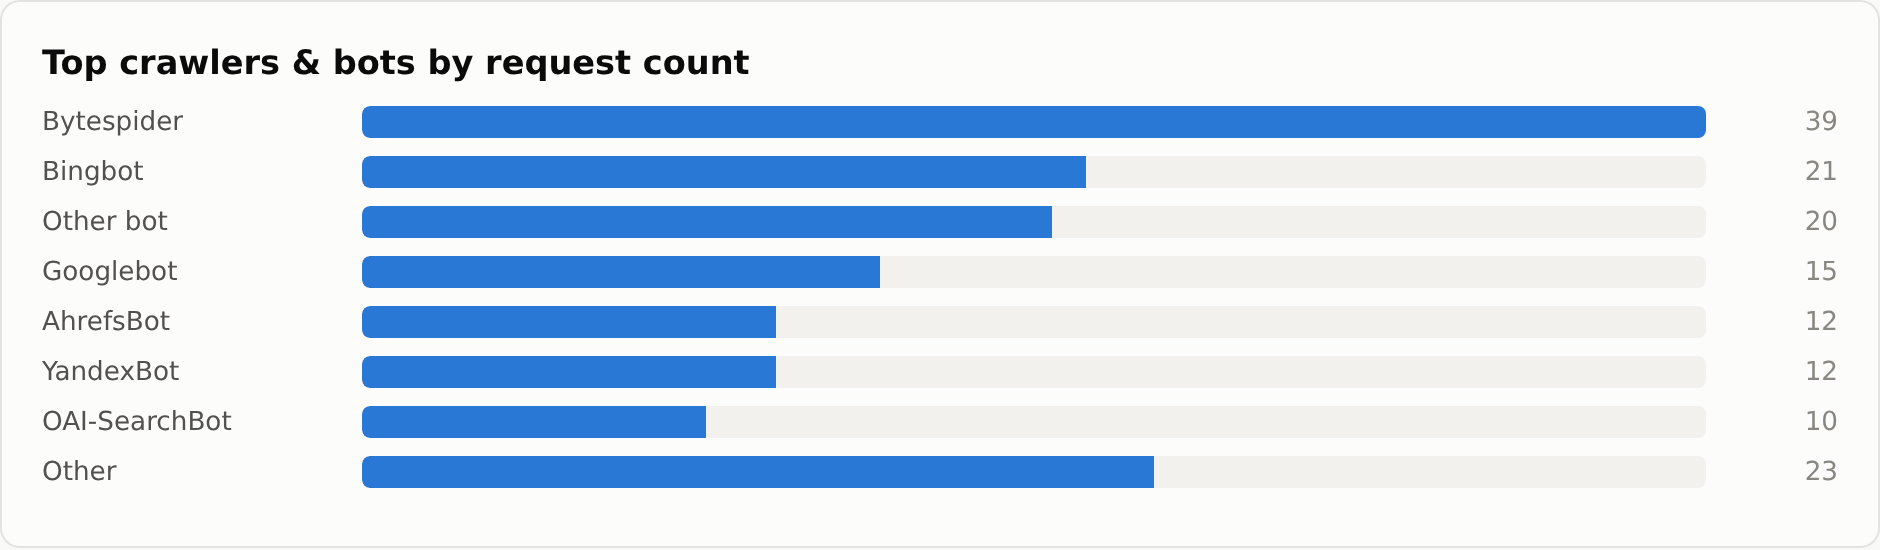
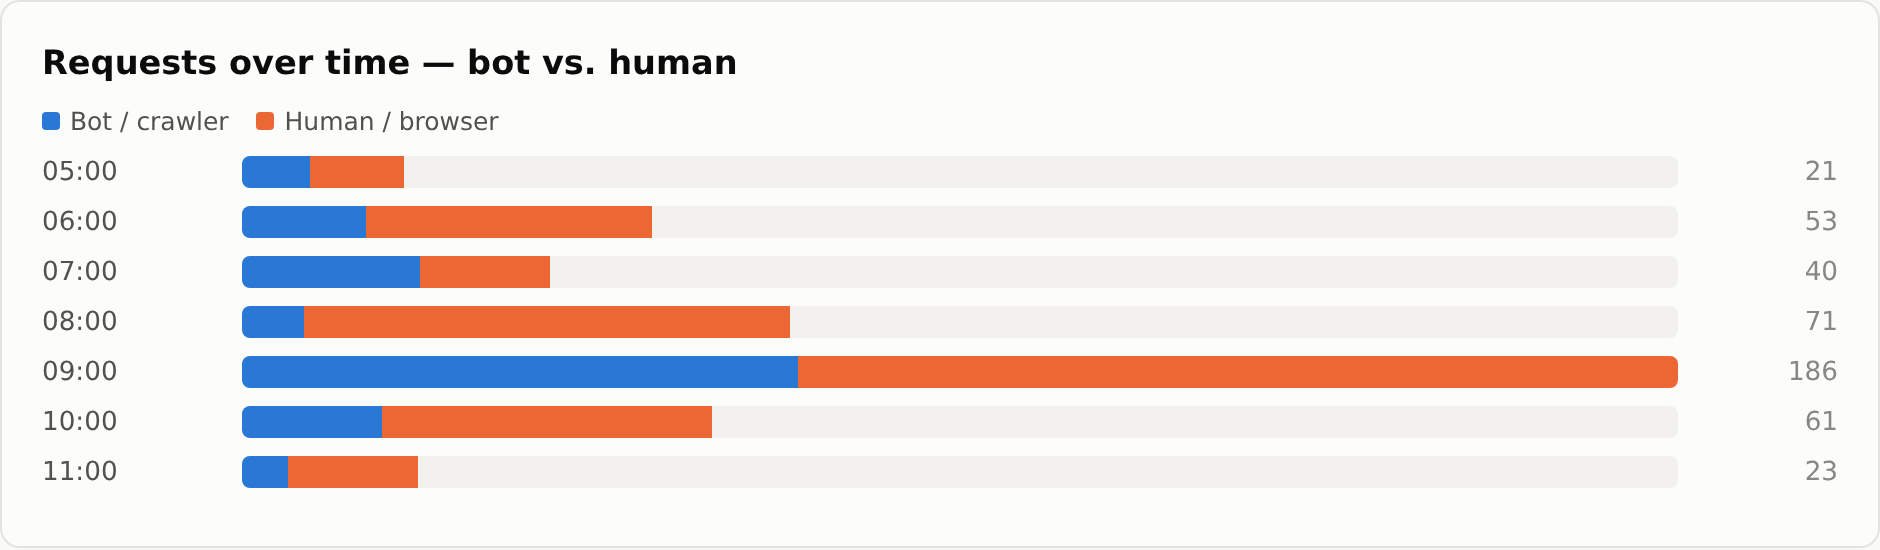
The tool automatically generates:
- Top crawlers by request count
- Requests over time
- Bot vs. human traffic
- HTTP status codes
- URLs receiving the most bot requests
These are the same questions you would answer manually with a spreadsheet.
Step 9.5: Search individual requests #
Use the searchable request table to investigate specific:
- URLs
- IP addresses
- User-agents
- Crawlers
For example, searching for:
googlebot
returns the requests claiming to be Googlebot, allowing the genuine and spoofed IPs to be compared directly.
What the sample log analysis found #
The six-hour sample produced several useful findings.
1. Two of fifteen Googlebot requests were spoofed #
Of the 15 requests claiming to be Googlebot, two failed verification.
Both requested the same page.
This demonstrates why crawler verification matters.
2. Bytespider generated more requests than Googlebot #
Bytespider generated 39 requests in the sample.
That was more than Bingbot and more than twice the number of genuine Googlebot requests in this dataset.
This is a useful reminder that the crawler mix on a website may be very different from what you assume.
3. Bots generated 33% of requests #
Of the 455 requests in the sample, 152 were identified as bot requests.
That represents approximately 33% of all requests during the analyzed period.
This matters when evaluating server load, caching and traffic patterns.
4. Googlebot encountered redirects #
Googlebot requested an old URL and received a 301 redirect to the correct URL.
This is a signal to investigate whether an internal link, sitemap entry or other source is still referencing the old URL.
5. Some automated traffic was unrelated to SEO #
The logs also contained a scanner probing administrative URLs such as:
/admin
/admin/login.php
This traffic is not search-engine crawling.
It is another reason to analyze the entire bot ecosystem rather than looking only at Googlebot.
What can you answer with log-file analysis? #
After analyzing server logs, you can answer questions such as:
Is Google actually crawling my new page? #
Find requests for that exact URL, then verify that the requesting IP belongs to Google.
Which pages does Google crawl most frequently? #
Filter verified Googlebot requests and group them by URL.
Are crawlers hitting redirects? #
Filter crawler requests by 301 and 302 status codes.
Are crawlers receiving errors? #
Filter for 4xx and 5xx responses.
Are fake bots pretending to be Googlebot? #
Compare the claimed Googlebot requests against Google's IP ranges and DNS verification process.
Which bots consume the most crawl activity? #
Group requests by verified crawler identity and compare request counts.
Are important pages being crawled? #
Filter the logs for your important URLs and check whether verified search-engine crawlers are requesting them.
The practical SEO workflow #
If you are using log files for SEO, follow this process:
1. Export the raw server logs.
↓
2. Make sure the logs contain IP, URL, user-agent, timestamp and status code.
↓
3. Identify crawler requests from their user-agents.
↓
4. Verify important crawler traffic using published IP ranges or DNS verification.
↓
5. Group requests by crawler.
↓
6. Group requests by URL.
↓
7. Analyze status codes.
↓
8. Check crawl activity over time.
↓
9. Investigate redirects, errors and repeatedly crawled low-value URLs.
↓
10. Compare the findings with your site's SEO priorities and fix the underlying issues.
This turns a raw access log into an actual SEO diagnostic dataset.
Final takeaway #
Search Console tells you about Google's crawl activity. Server logs show the requests that actually reached your server.
That difference is what makes log-file analysis valuable.
With server logs, you can determine:
- What was requested
- When it was requested
- Which IP requested it
- Which crawler claimed to make the request
- What response the server returned
- How frequently URLs are being crawled
And, importantly, you can verify whether a request claiming to be Googlebot is actually coming from Google.
In the sample analyzed here, that process exposed two spoofed Googlebot requests out of fifteen — something that would not be apparent from simply looking at the user-agent string.
The key principle is simple:
Do not treat crawler identity as a claim. Verify it.
Once you understand that principle, log-file analysis becomes much more than looking at server traffic. It becomes a practical way to understand how search engines and other crawlers interact with your website.
Analyze your own logs #
The browser-based log analyzer used in this walkthrough can be used to process your own Hostinger Access Log CSV and automatically generate the crawler, status-code, URL and traffic analysis described above.
[TODO: Add final log analyzer tool URL]
If you want to go beyond identifying crawl activity and learn how to diagnose and fix the SEO issues revealed by server logs, log-file analysis is covered hands-on in Day 1 of the Technical SEO Workshop on November 21.
Register for the Technical SEO Workshop →
Related: Log File Analysis · Crawl Budget


No comments yet. Be the first to respond.