
Claim or add your business in ChatGPT's Business Hub, verify that you own it, and get the profile ready for insights, products and a customer-facing business agent. Every screen is annotated: the red numbered markers show what to select, in order.
Before you start #
Business Hub lets an owner or authorized representative claim a business in ChatGPT, keep its details current, upload product information and see how people find it: mentions, website clicks and discovery topics. Eligible businesses can also publish a business agent that answers customer questions about products and policies.
| You'll need | Why |
|---|---|
| A ChatGPT account (any plan) | The profile is managed from this account. No Ads account or Enterprise agreement is required. |
| Access to your domain's DNS (e.g. Cloudflare, GoDaddy) | Needed for website-domain verification. |
| Your business phone and email | One-time codes are sent to both. |
| A government-issued ID (and possibly business registration documents) | Required by Persona before you can publish changes, view insights or build an agent. |
Part 1: Open Business Hub and find your business #
Open Business Hub #
Sign in to ChatGPT and open Business from the sidebar, or go directly to chatgpt.com/business-hub. The landing page reads “Reach new customers and grow your business with ChatGPT.”
Search for your business by name #
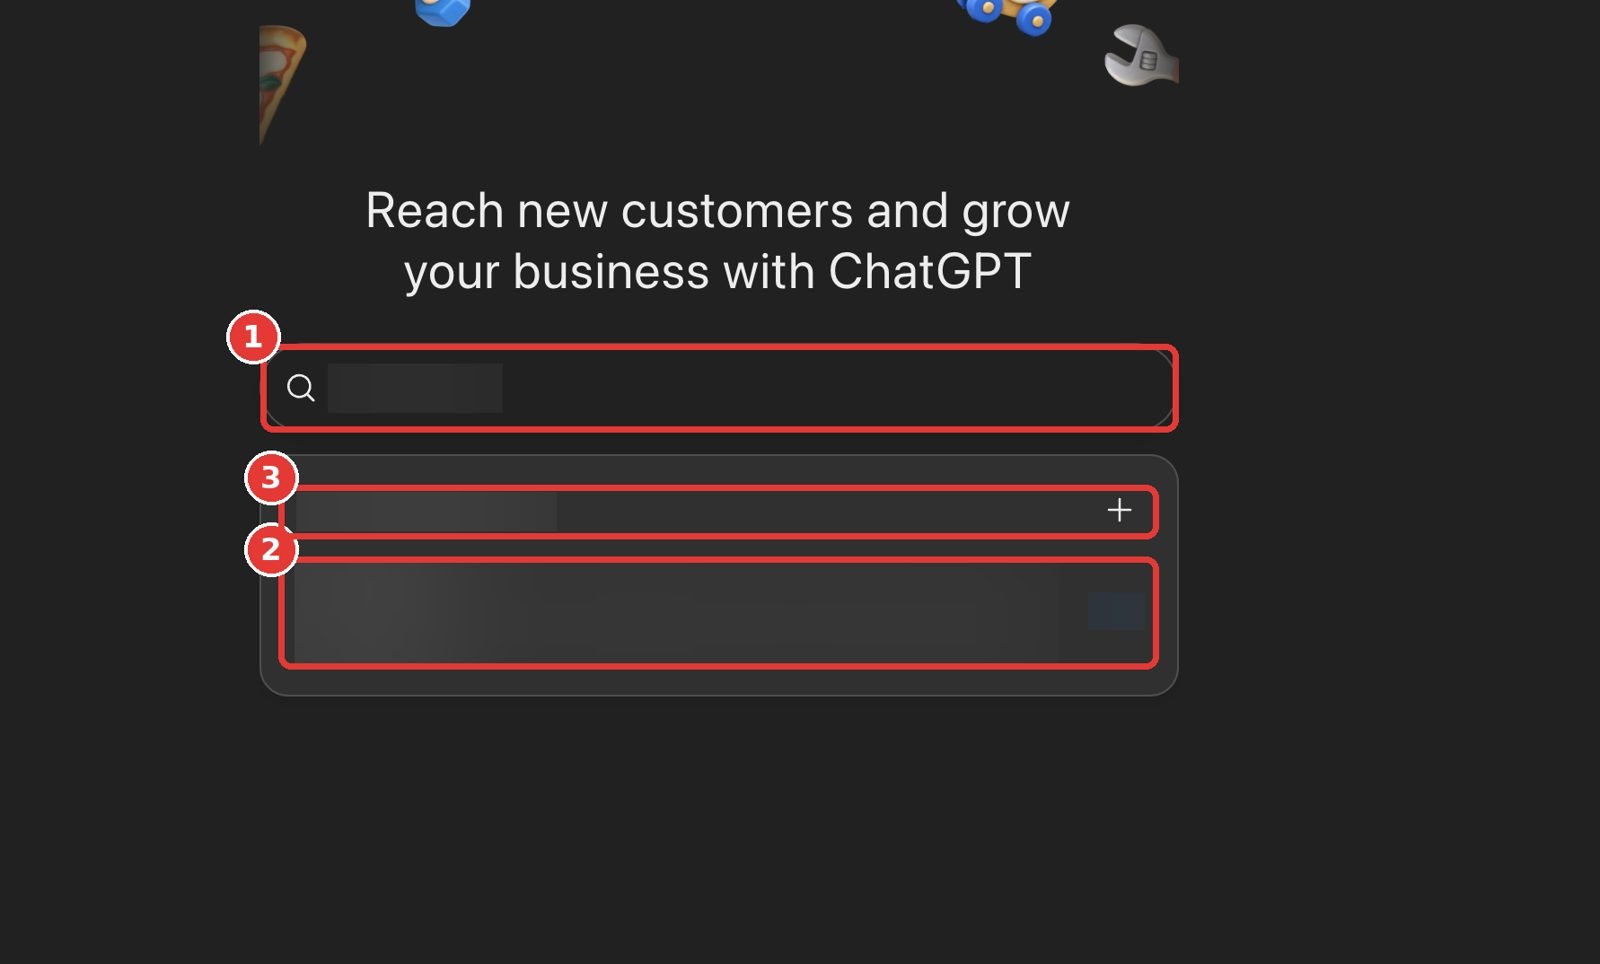
- 1Type your business name in the search box.
- 2If your business appears with the right address, select that listing to claim it.
- 3If it doesn't exist yet, select Create ‘Your business name’ to add it (available to eligible online businesses).
Enter your business details and choose a verification method #
Confirm the ChatGPT account that will manage the business, then fill in the basics: website, category (for example Marketing agency), phone, email, delivery and return policies. A preview card on the right updates as you type. Next, choose a verification method: Website domain, Business phone, Business email or Shopify store.
Part 2: Verify with your website domain #
Copy the TXT record ChatGPT gives you #
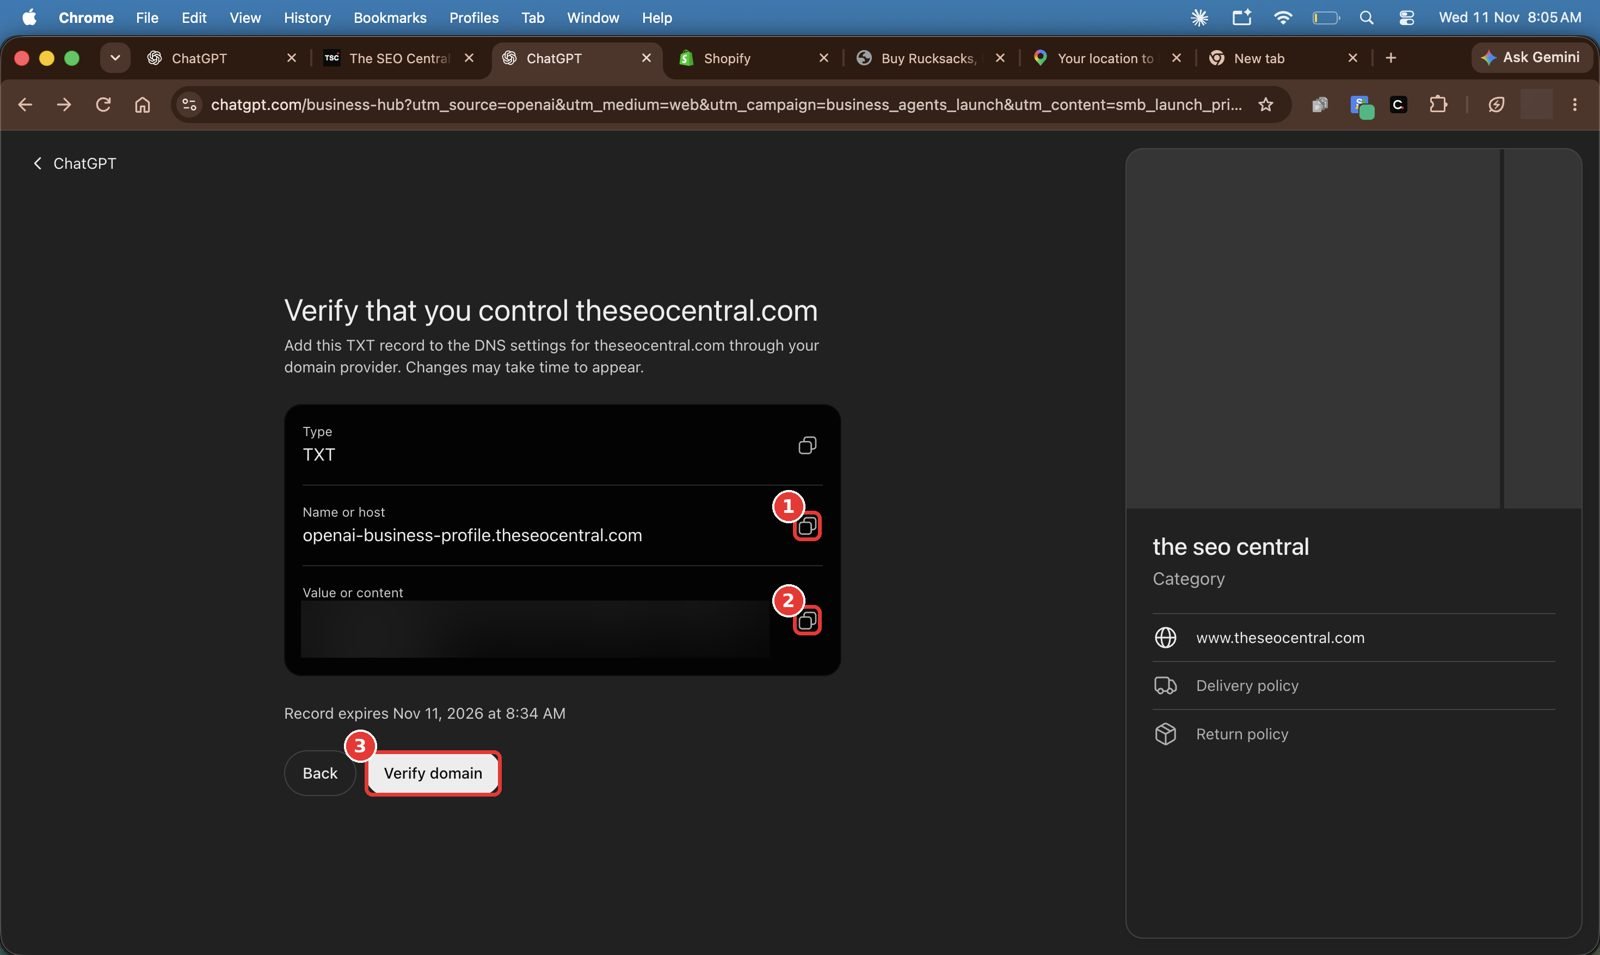
- 1Copy the Name or host value (format:
openai-business-profile.yourdomain.com). - 2Copy the Value or content (format:
openai-business-profile=). Use the copy icons so no character is missed. - 3Leave this tab open. You'll come back to select Verify domain after adding the record.
Add the TXT record in your DNS provider (Cloudflare example) #
In a new tab, open your DNS provider. In Cloudflare: select your domain → DNS → Records.
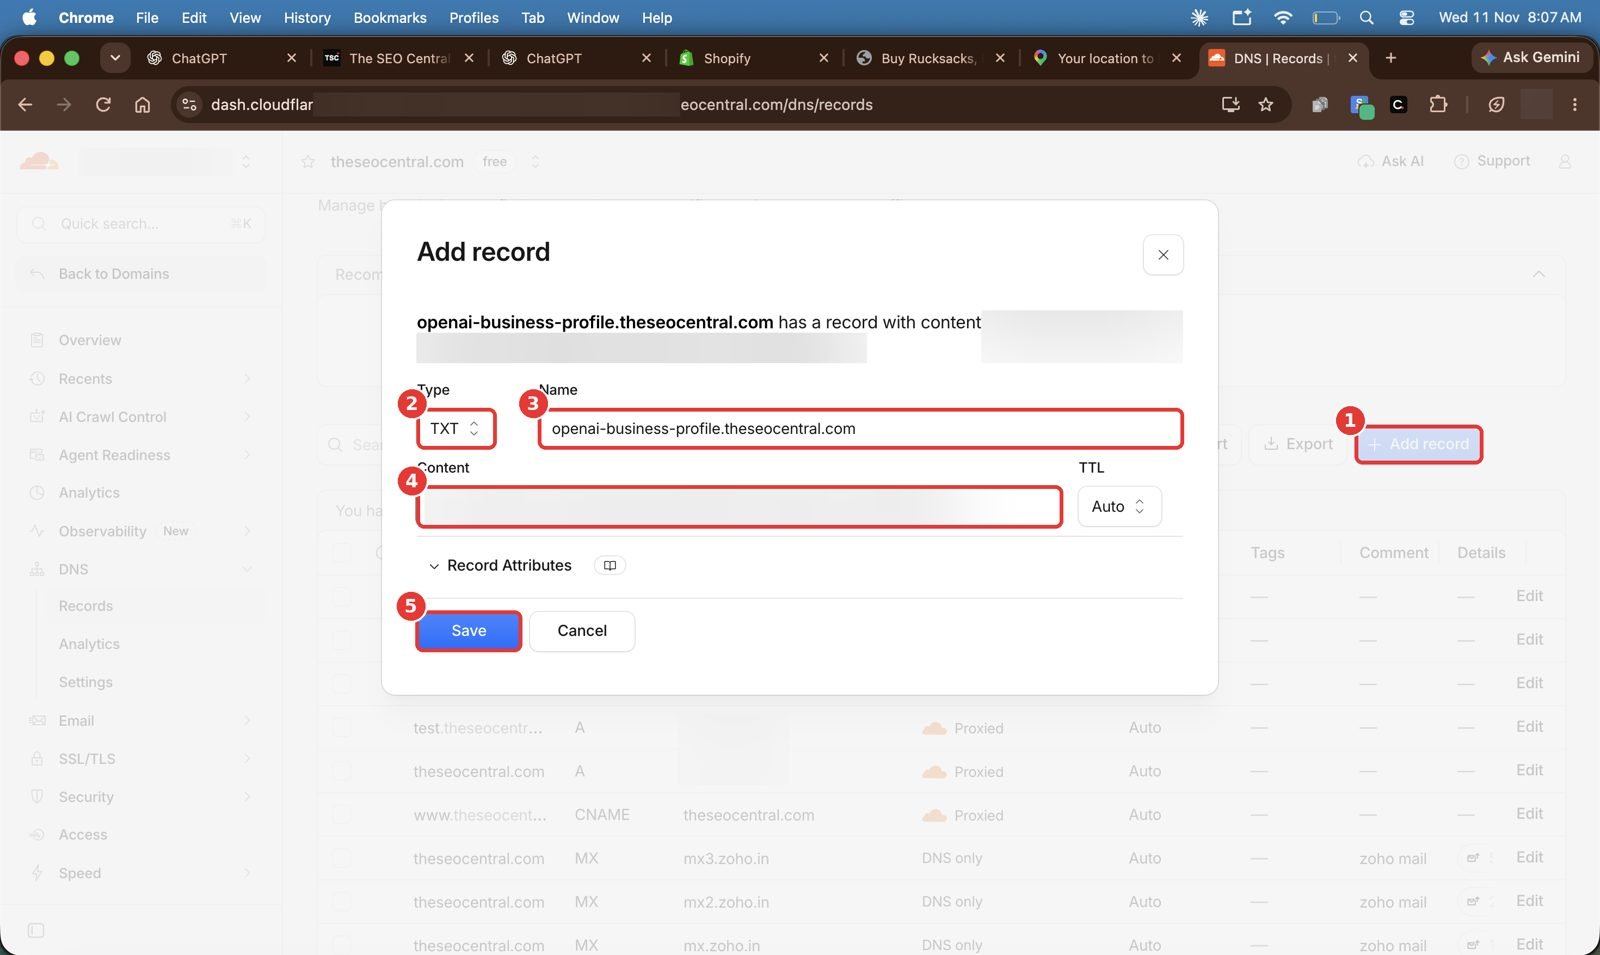
- 1Select + Add record.
- 2Set Type to
TXT. - 3Paste the Name you copied. Cloudflare accepts the full host or just
openai-business-profile. - 4Paste the Content value exactly. Leave TTL on
Auto. - 5Select Save.
Return to ChatGPT and select Verify domain #
Go back to the ChatGPT tab (marker 3 in the step 4 screenshot) and select Verify domain. DNS can take a few minutes, or occasionally longer, to propagate. If it fails, wait and try again. You can check the record yourself with dig TXT openai-business-profile.yourdomain.com or any online DNS lookup.
Part 3: Verify your phone and email #
Enter the code sent to your business phone #
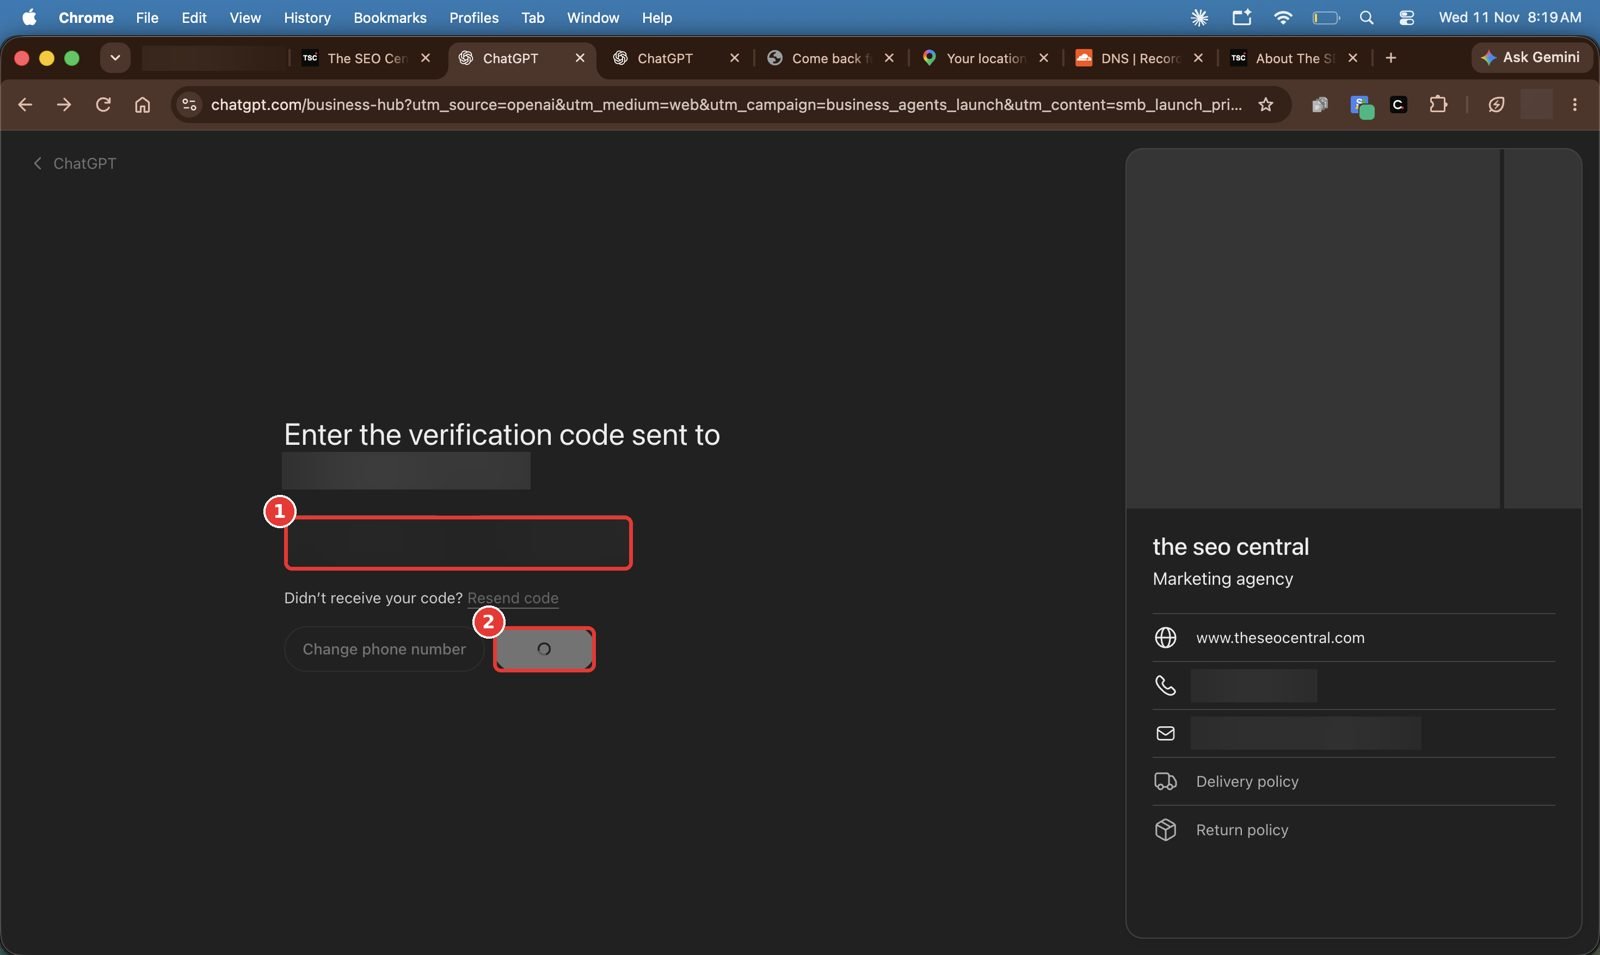
- 1Enter the 6-digit code from the SMS (or automated call).
- 2Select the confirm button. A spinner appears while it checks the code.
Enter the code sent to your business email #
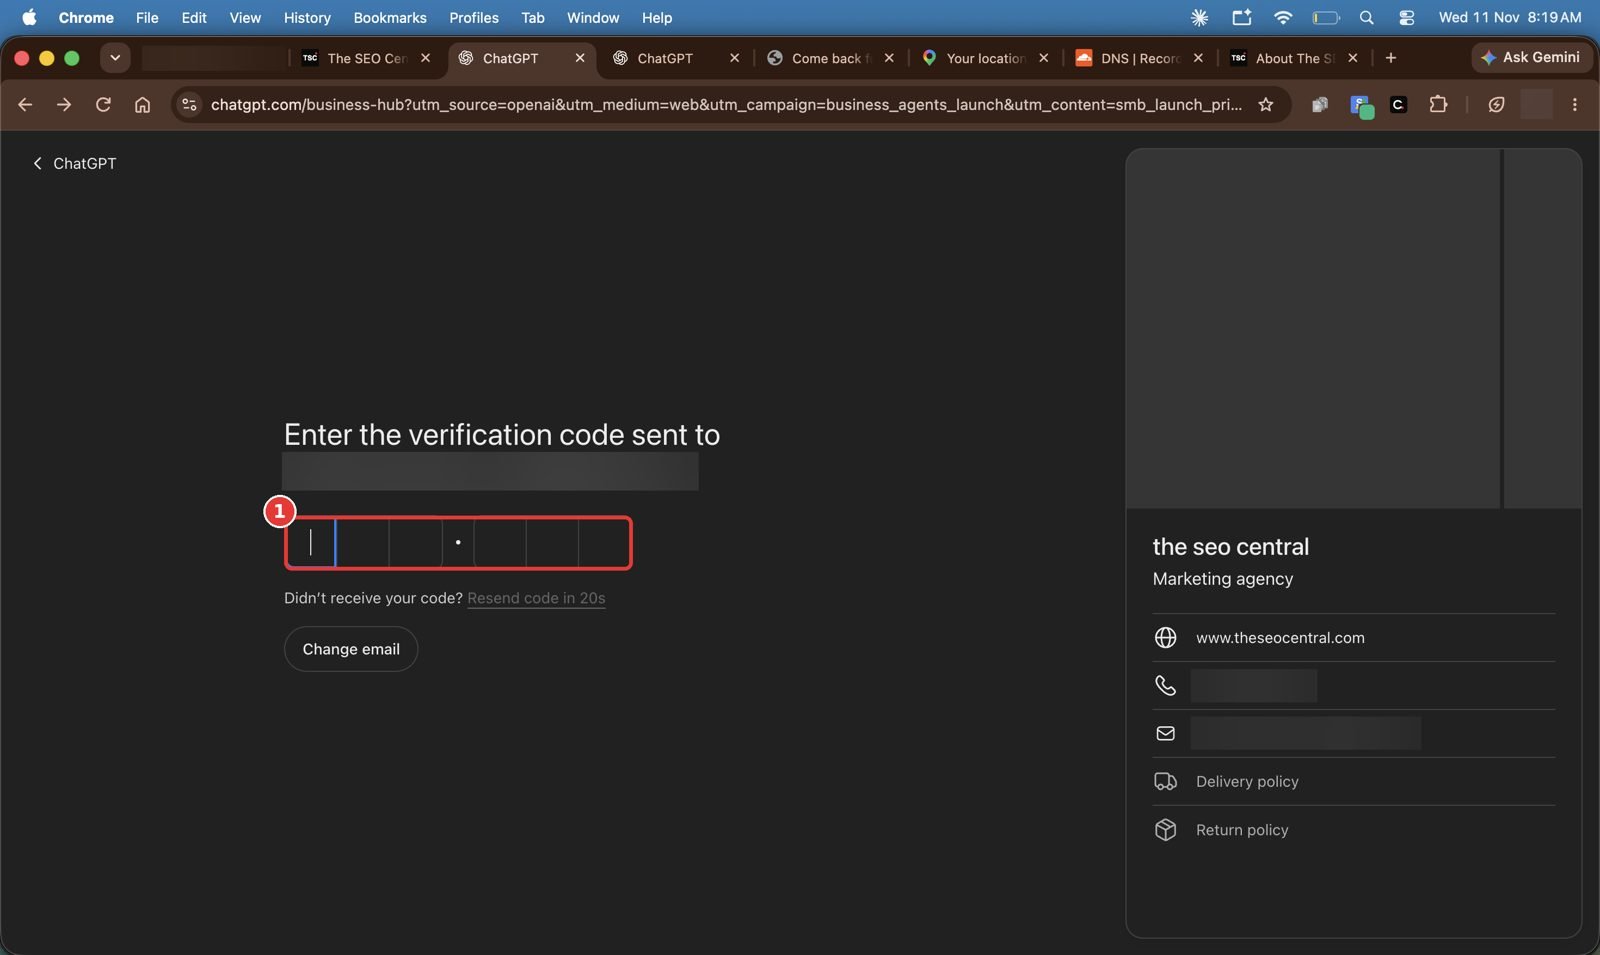
- 1Open the email from OpenAI and enter the 6-digit code. Check spam if it hasn't arrived within a minute.
Alternative: verify through your Shopify store #
If your business runs on Shopify, you can verify by connecting the store instead of using DNS. In Business Hub choose Shopify store → Connect Shopify → Log in to Shopify, and sign in to the store you're claiming. Shopify then asks you to install the ChatGPT app:
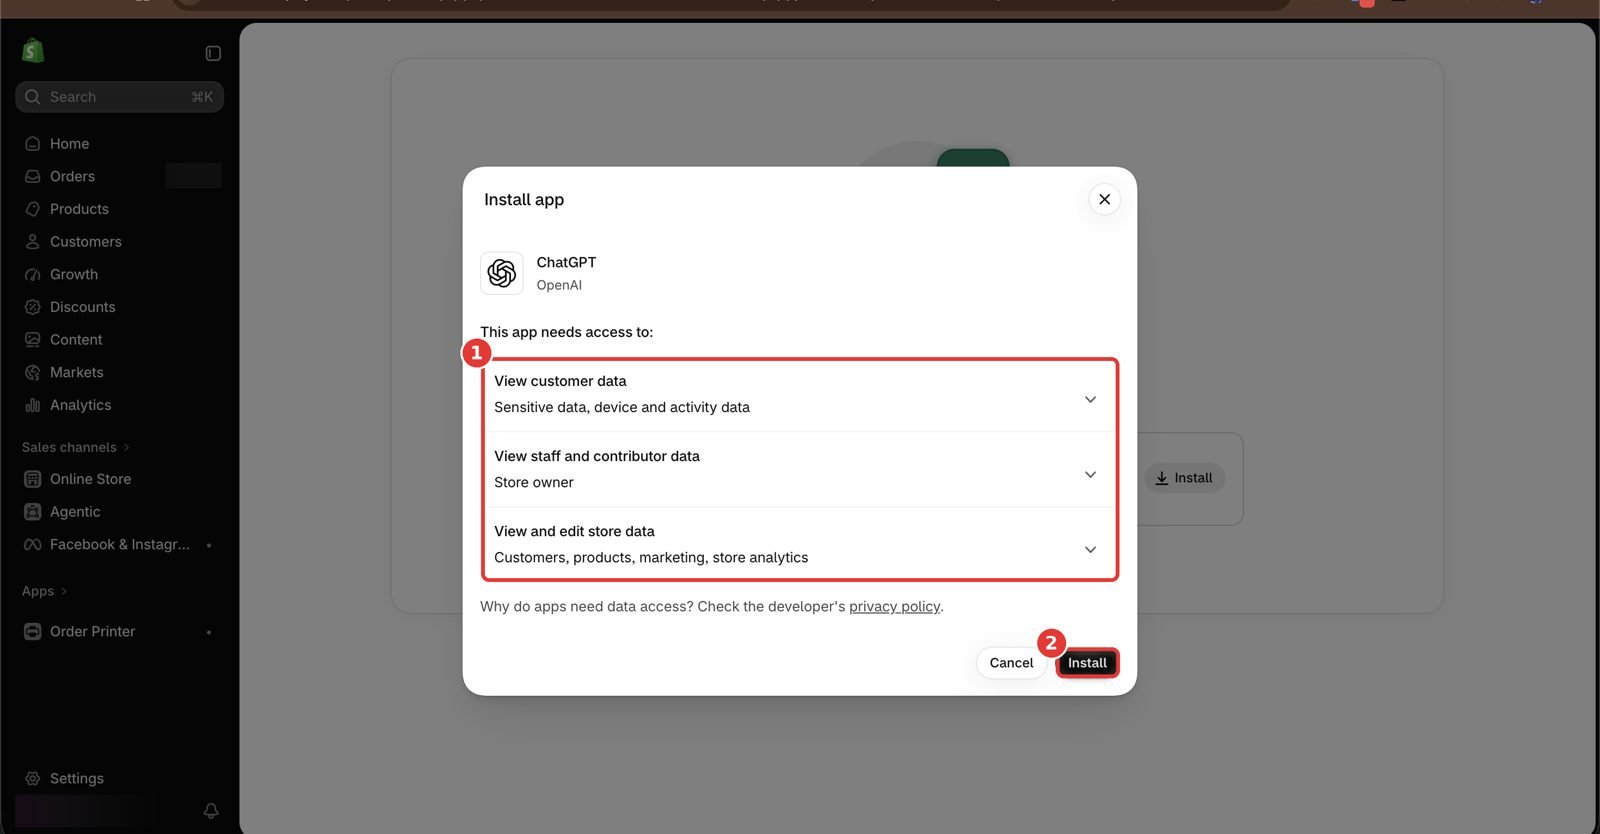
- 1Review the permissions: View customer data, View staff and contributor data and View and edit store data (customers, products, marketing, analytics). Expand each row to see the details.
- 2Select Install.
Part 4: Your business dashboard #
Review the Overview page #
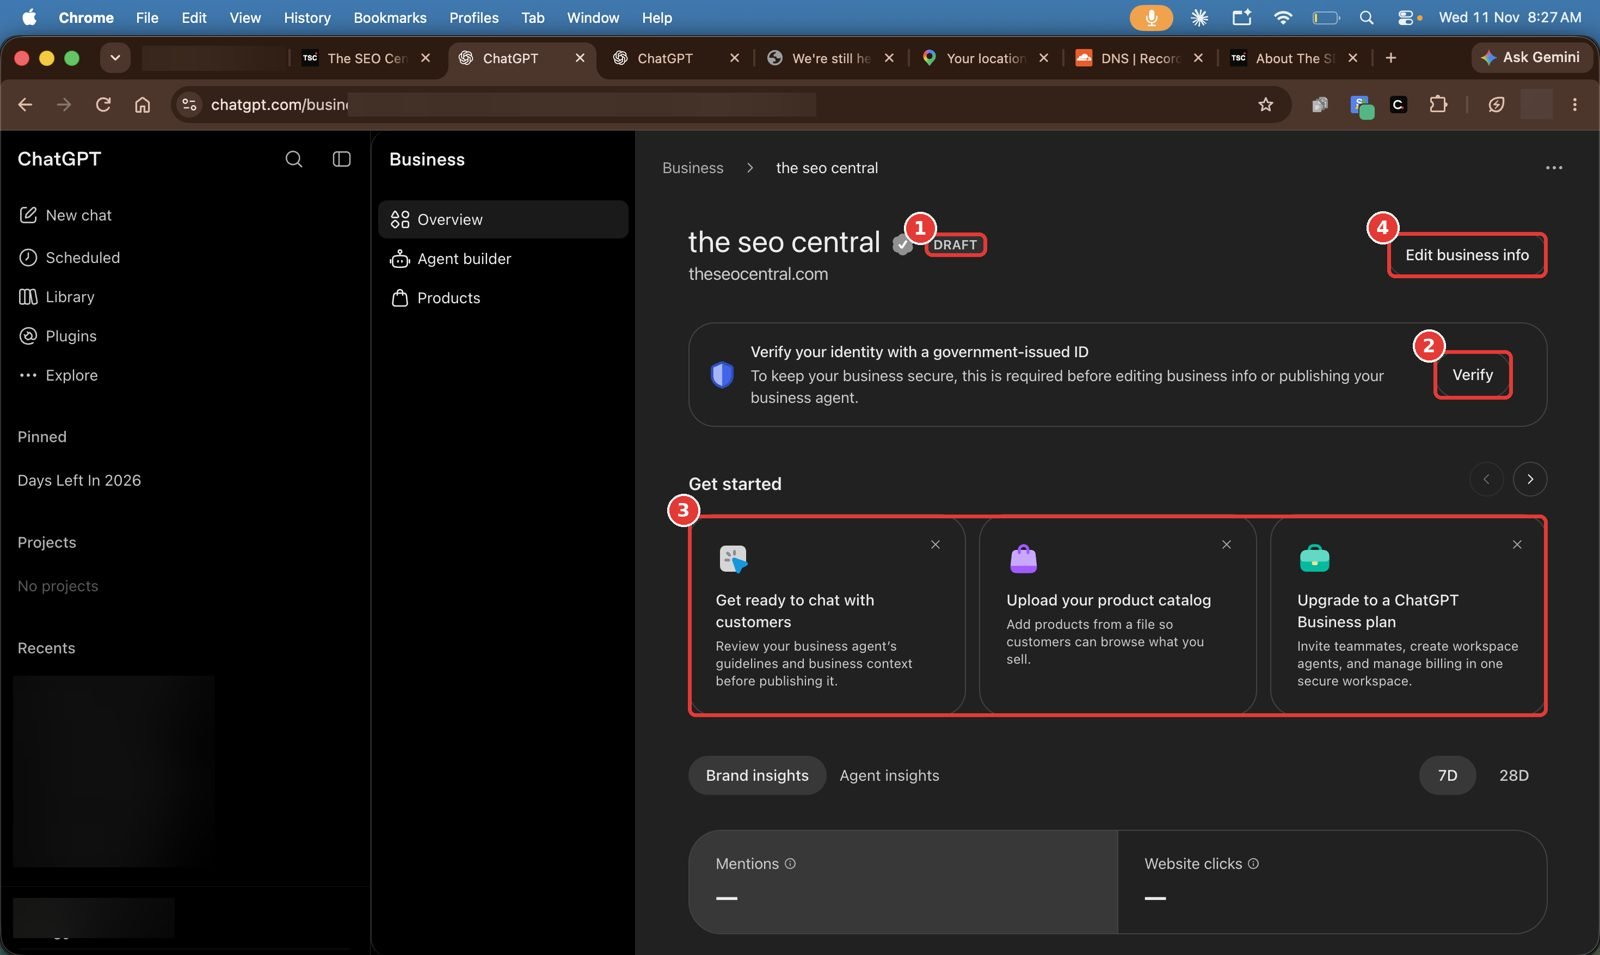
- 1DRAFT: the profile isn't published yet. Only unpublished drafts can be deleted (••• menu → Delete draft).
- 2Verify: identity verification is required before you can edit business info or publish the agent (see step 10).
- 3Get started cards: review your agent's guidelines, upload a product catalog, or upgrade to a ChatGPT Business plan for teammates and workspace agents.
- 4Edit business info: update website, description, category, logo, cover photo, delivery and return policies (unlocked after Persona approval).
Part 5: Complete identity verification with Persona #
Select Verify and finish the Persona check #
- On the Overview page, find Verify your identity with a government-issued ID and select Verify (marker 2 above).
- Select Continue to Persona.
- Follow the prompts: photograph your ID, take a selfie, and add business registration details or proof of authorization if asked.
- Wait for the approval email. You can withdraw with Cancel submission while the check is pending.
Part 6: Insights, Agent builder and Products #
Brand insights #
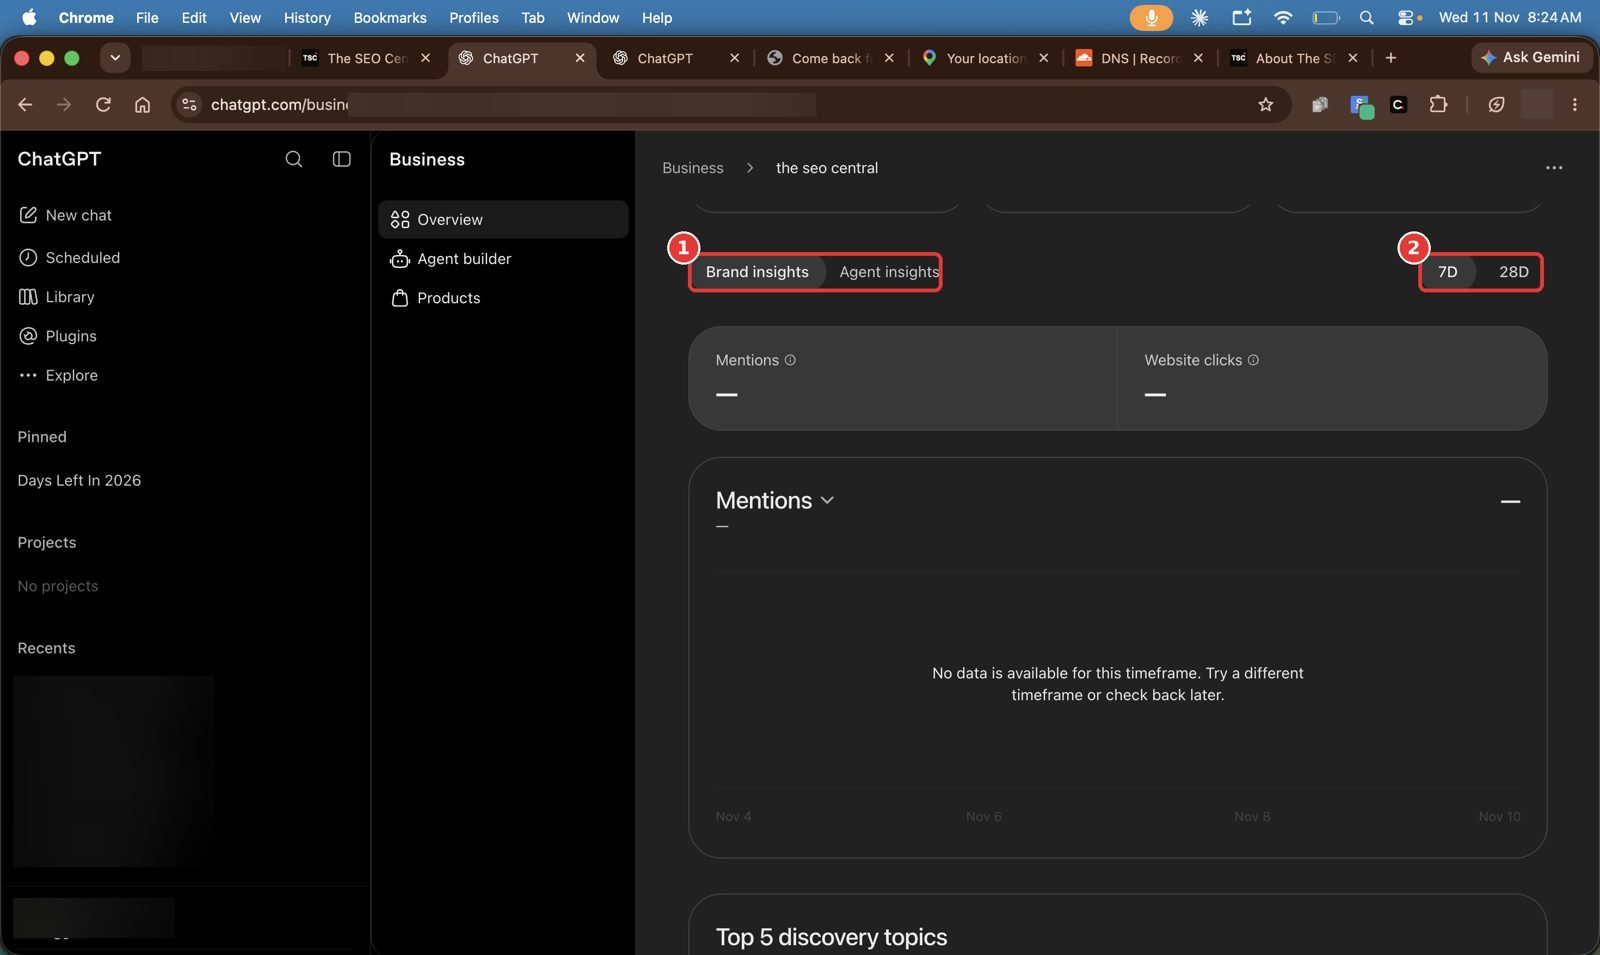
- 1Switch between Brand insights (how ChatGPT mentions you) and Agent insights (activity on your business agent).
- 2Choose the reporting window: 7D or 28D.
Agent builder #
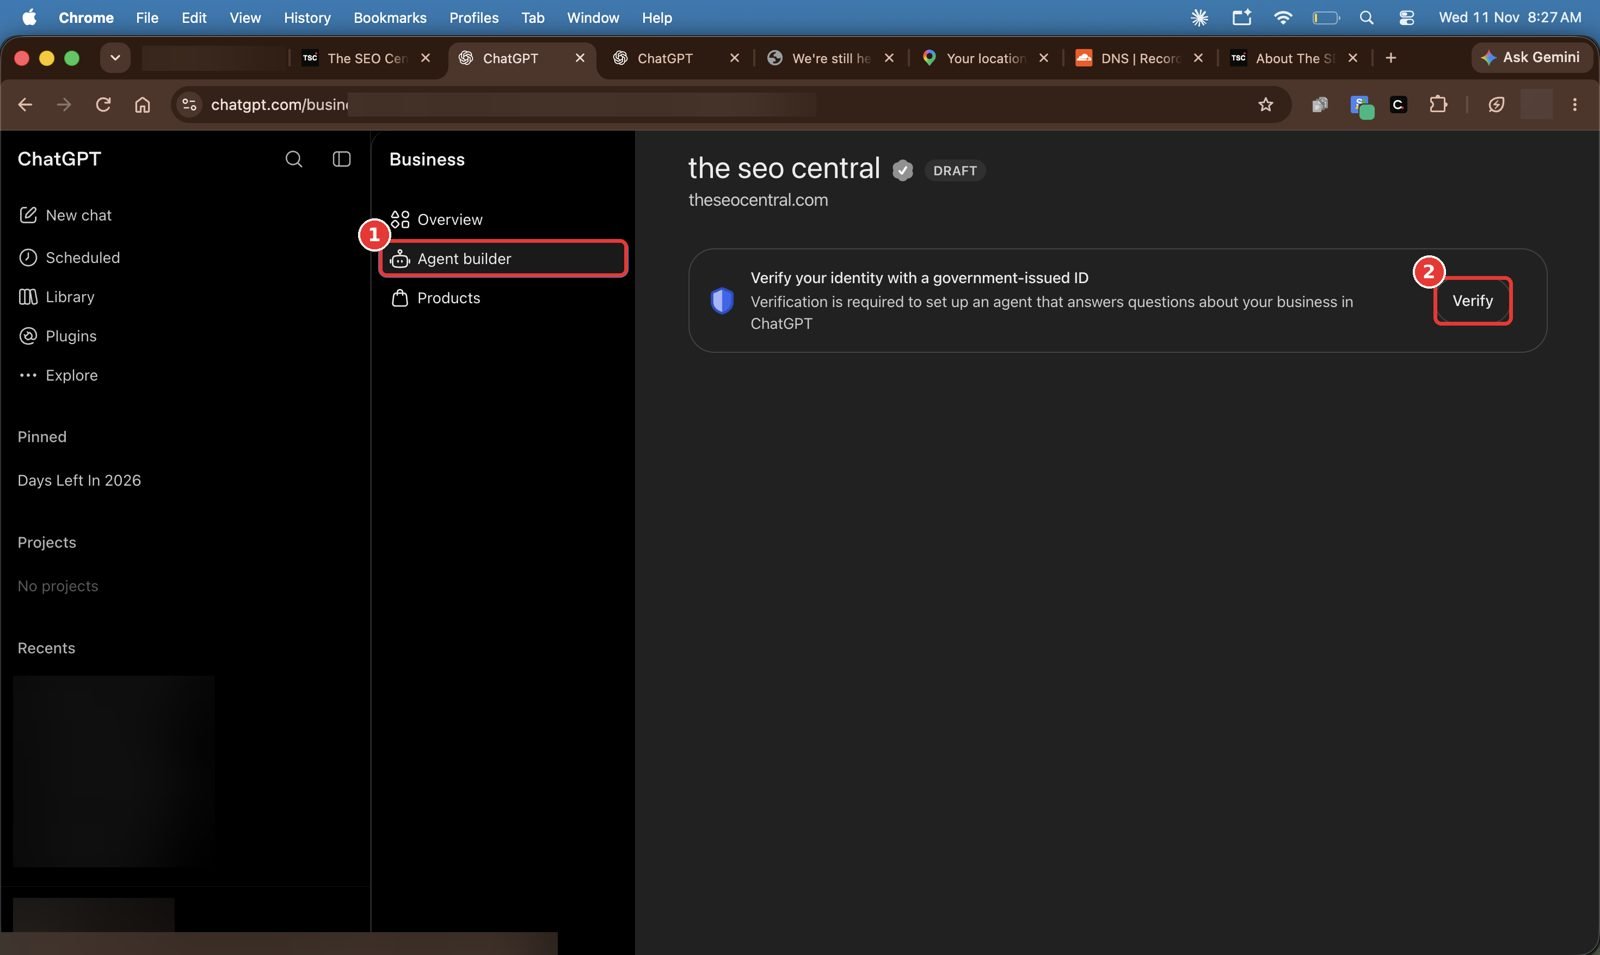
- 1Open Agent builder from the Business menu.
- 2Until Persona is approved you'll only see the Verify prompt.
Products #
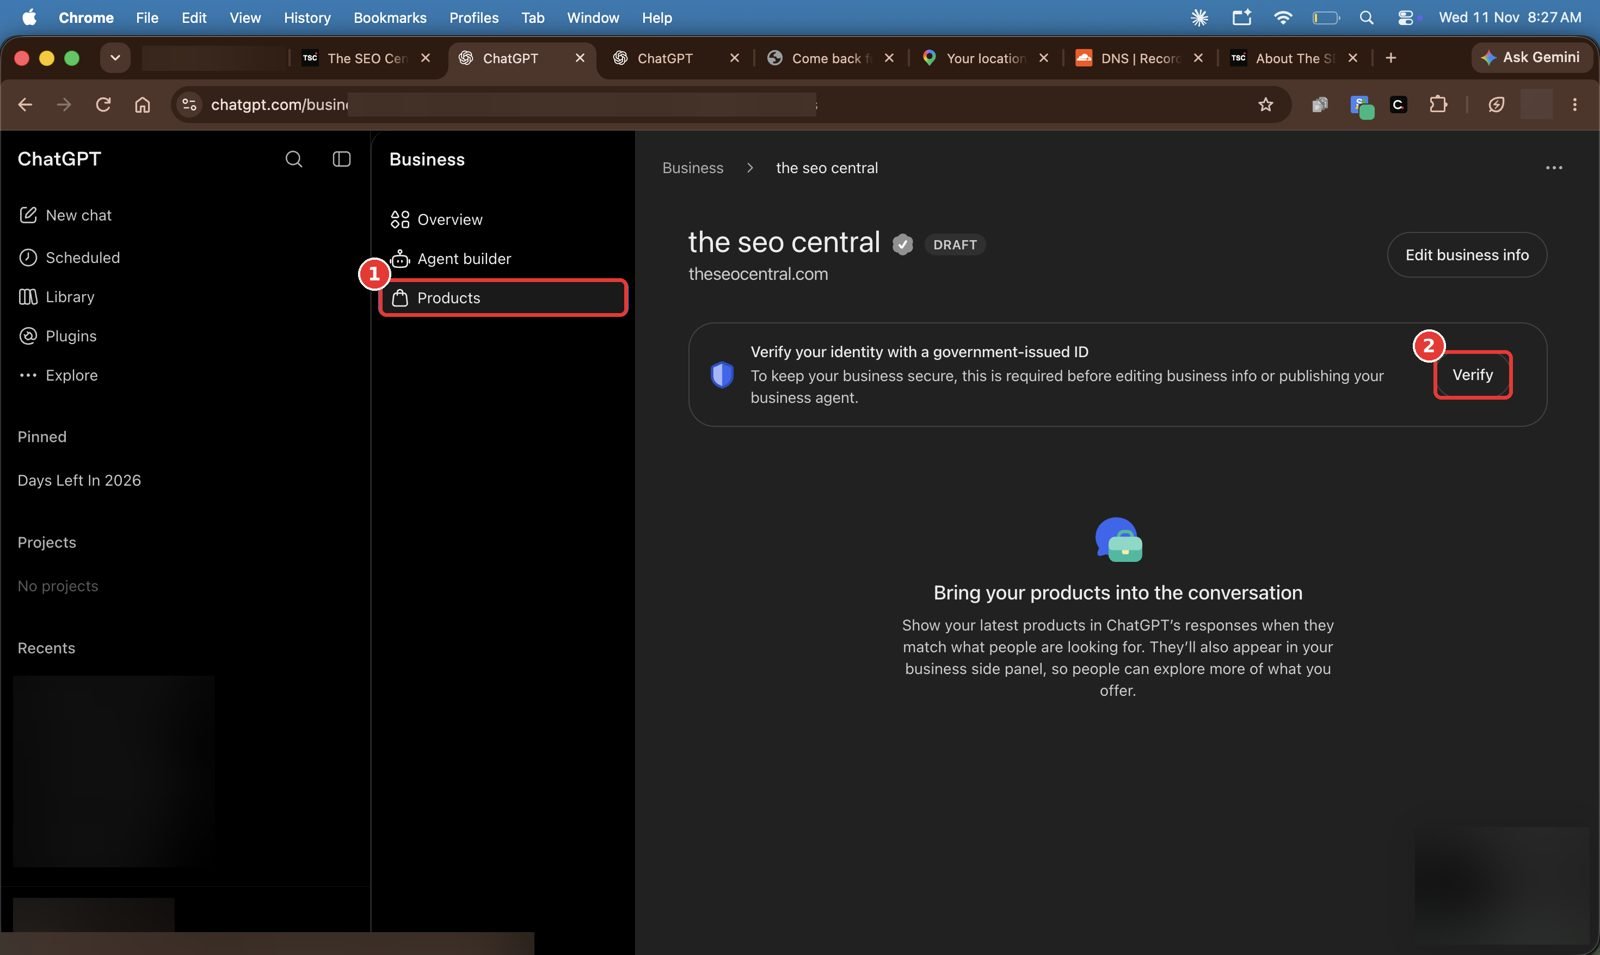
- 1Open Products to add your catalog so it can appear in ChatGPT answers and your business side panel.
- 2Verification is required first.
Troubleshooting and FAQs #
| Problem | What to do |
|---|---|
| Verify domain fails | Check that the name and value match exactly (no extra quotes or spaces) and that the record hasn't expired. Wait for DNS to propagate, then retry. A record added at the root domain instead of the openai-business-profile host won't work. |
| Code never arrives | Wait for the resend timer. Check spam for email, or switch SMS to an automated call. |
| Business already claimed by someone else | Open its profile → ••• → Dispute ownership, then verify with Persona. |
| Can't create an agent | Confirm Persona is approved and your business meets the location, type and industry requirements. |
| Updated details not showing | OpenAI reviews changes before publishing, and ChatGPT may also draw on other sources. |
Does claiming boost rankings in ChatGPT? No. It lets you control the information you provide, but it doesn't guarantee visibility, and advertising doesn't influence ChatGPT's independent answers.
Can an agency manage it? Yes. The admin who claimed the business can add teammates and grant an agency access. Each person signs in with their own ChatGPT account. Don't forward a personal claim invitation.
Multiple brands? Each brand is claimed and managed separately. Claiming the main brand doesn't claim its locations.


 Hanin MP
No comments yet. Be the first to respond.